Developer Guide
Team: F11-04 Name: EZSTATES
User Target Profile: This product is for real estate agents who have to manage numerous client information and their relevant property transactions. It caters to those who need a fast, efficient tool to organize all their client data, track listings, and wish to streamline their workflow through command-line operations.
Value Proposition: EZSTATES provides freelance real estate agents quick access to client details, categorized by their property’s needs and interests through a user-friendly CLI, streamlining operations by enabling swift and intuitive command-line interactions. This simplifies their workflow, boosts efficiency, and enhances their client service.
- Acknowledgements
- Getting started
- Development Milestones
- Design Overview
- Continuous Integration (CI)
- Features and Implementation
- Git Commit Script
- Documentation, logging, testing, configuration, dev-ops
- Appendix
-
Appendix: Requirements
- Product scope
- User stories
-
Use cases
- Use Case: Add Buyer
- Use Case: Add Seller
- Use Case: Edit Client Profile
- Use Case: Delete Client Profile
- Use Case: Add Appointment
- Use Case: Delete Appointment
- Use Case: List Clients
- Use Case: Find Client by Name
- Use Case: List Appointments
- Use Case: Add Listing
- Use Case: Show Listings
- Use Case: Find Listings
- Use Case: Edit Listing
- Use Case: Add Buyers to Listing
- Use Case: Remove Buyers from Listing
- Use Case: Delete Listing
- Use Case: Clear Listings
- Use Case: More Info
- Use Case: Chat Window
- Use Case: Help
- Use Case: Exit Application
- Non-Functional Requirements
- Appendix: Instructions for manual testing
- Launch
- Command Summary
- Saving data
- Future Enhancements
- Appendix: Known Bugs
Acknowledgements
This project is adapted from the AddressBook-Level3 project created by the SE-EDU initiative
Getting started
Setting up
In order to develop for EZSTATES you can follow the steps we have provided below:
Ensure that the project is set up locally:
- Create a fork of the GitHub repository
-
Clone the fork
git clone https://github.com/<your Github username>/tp.git -
Change to the fork local directory
cd tp/ -
Build the project
./gradlew build -
Run the project
./gradlew run
The Gradle instructions provided are for macOS and Linux users. If you are using Windows, please refer to the official documentation on using the Gradle Wrapper (i.e. ./gradlew) on Windows.
Development Milestones
Milestone v1.1
General Update
- Add individual photos
- Update AboutUs.md
Milestone v1.2
Deciding MVP features
- Divided features amongst group mates
Milestone v1.3
Minimum Viable Product
- Creating clients
- Deleting clients
- Editing clients
- Creating appointments
- Deleting appointments
Milestone v1.4
Alpha Release
- Create Buyer
- Create seller
- Listings
- Help Bot
- Git Commit script
Milestone v1.5
Beta Release
Design Overview
.puml files used to create diagrams in this document docs/diagrams folder. Refer to the PlantUML Tutorial at se-edu/guides to learn how to create and edit diagrams.
Architecture
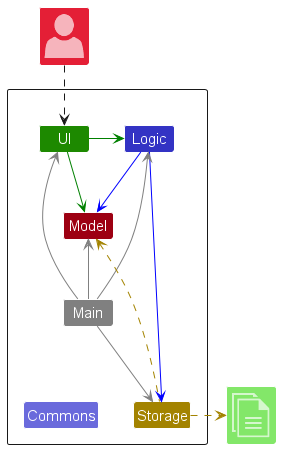
The Architecture Diagram given above explains the high-level design of the App. EZSTATES utilises the existing architecture from AB3 and adds its own features and components to facilitate client and listing management.
Given below is a quick overview of main components and how they interact with each other.
Main components of the architecture
Main (consisting of classes Main and MainApp) is in charge of the app launch and shut down.
- At app launch, it initializes the other components in the correct sequence, and connects them up with each other.
- At shut down, it shuts down the other components and invokes cleanup methods where necessary.
The bulk of the app’s work is done by the following four components:
-
UI: The UI of the App. -
Logic: The command executor. -
Model: Holds the data of the App in memory. -
Storage: Reads data from, and writes data to, the hard disk.
Commons represents a collection of classes used by multiple other components.
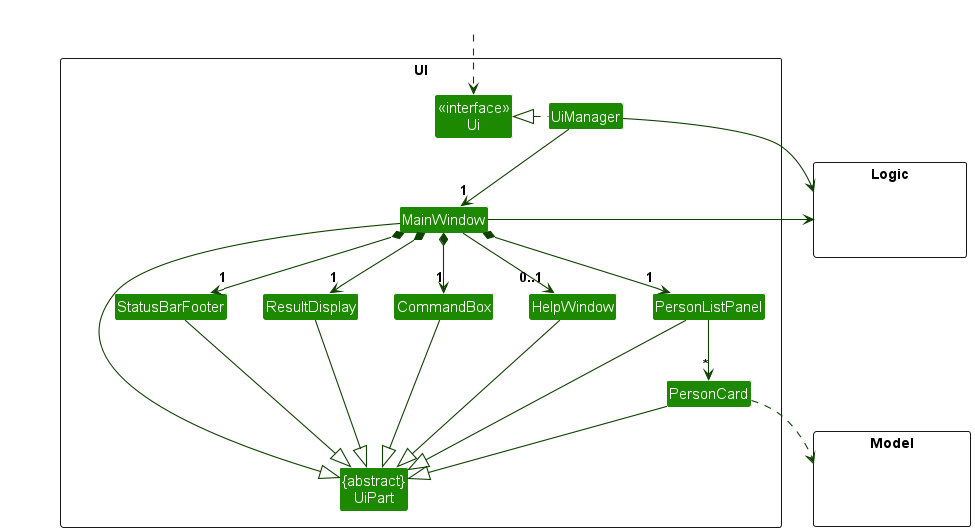
UI component
The API of this component is specified in Ui.java
The UI component uses the JavaFx UI framework. The layout of these UI parts are defined in matching .fxml files that are in the src/main/resources/view folder. For example, the layout of the MainWindow is specified in MainWindow.fxml
The UI component,
- executes user commands using the
Logiccomponent. - listens for changes to
Modeldata so that the UI can be updated with the modified data. - keeps a reference to the
Logiccomponent, because theUIrelies on theLogicto execute commands. - depends on some classes in the
Modelcomponent, as it displaysPersonobject residing in theModel.
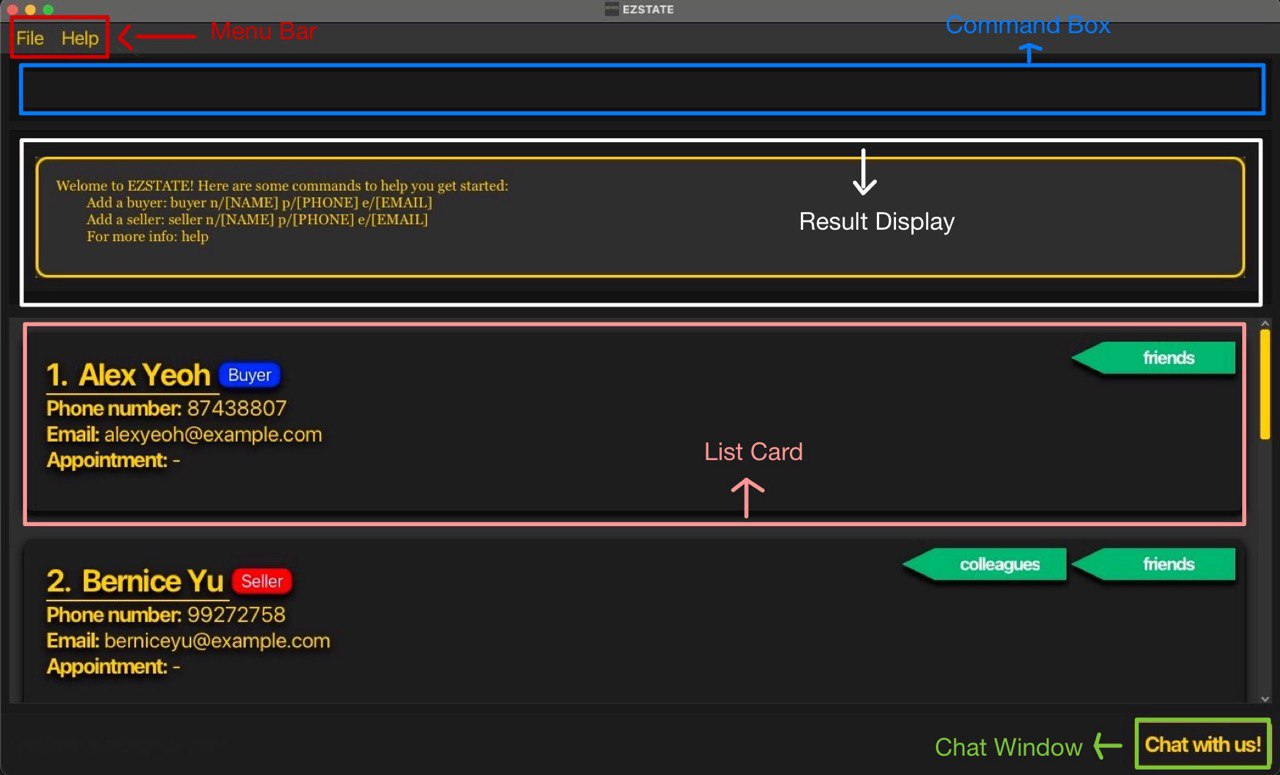
UI layout
EZSTATES is built for users who prefer using their keyboard. Hence, all commands are accessible through CLI interactions.
When the app is first opened, the user is able to immediately see the MainWindow.
EZSTATES displays a default message in the ResultDisplay which helps new users navigate
the application.
For developers, there are 5 main UI components that are essential in understanding the design and implementation of EZSTATES, which will be elaborated in the UI Components section.
UI Components
EZSTATES contains 4 main UI components:
- MainWindow
- HelpWindow
- Chat Window
- MoreInfo Window
- Confirmation Dialog
MainWindow Design
MainWindow consists of five main components CommandBox, ResultDisplay, PersonListPanel,ListingListPanel, StatusBarFooter.
The CommandBox allows users to enter commands into the application.
The ResultDisplay displays the result from entering a command.
The PersonListPanel is a scrollable list of clients. This list is updated when a user executes a command that interacts
with his list of clients such as buyer, seller, deleteclient and showclients.
The ListingListPanel is a scrollable list of listings. This list is updated when a user executes a command that interacts
with his list of listings such as listing, deletelisting, deletelisting and showlistings.
The StatusBarFooter is a pane which contains the ChatWindow.
MainWindow Implementation
These 5 components form the MainWindow:
-
CommandBox: Command input box -
ResultDisplay: Command results box -
PersonListPanel: Person list pane -
ListingListPane: Listing list pane -
StatusBarFooter: Contains theChatWindowbutton
All these, including the MainWindow, inherit from the abstract UiPart class which captures the commonalities between classes that represent parts of the visible GUI.
The UI components utilise JavaFx to render the components. The layout of these components are defined in their
matching .fxml files in src/main/resources/view folder. For example, the layout for CommandBox is found in
CommandBox.fxml.
This section will go through some additional information about each component in the MainWindow.
- Command Box
- The
CommandBoxis the main method by which the user interacts with EZSTATES. - The user types inputs into the
CommandBoxand hitsENTERto give a command to EZSTATES. - At any point in time, the user can press the
UPandDOWNarrow keys to navigate the history of past inputs.
- The
Additionally, the history preserves all inputs given by the user, including duplicate and invalid inputs.
- Result Display
- The
ResultDisplayprovides feedback to the user. - The
ResultDisplayis scrollable if the output message is too long.
- The
- PersonListPanel
- The
PersonListPanelcontains theclientsstored in EZSTATES. - The information of a relevant
clientis displayed using thePersonCardcomponent - The
PersonListPanelis a view ofPersonCardcomponents. - Commands such as
findwill filter thePersonListPanelto show certainclientsbased on a given predicate. Commands such asshowclientsdisplays all possibleclientsin thePersonListPanel. A newly addedclientis added to the bottom of thePersonListPanel.
- The
PersonCard
- The
PersonCardis the component that displays the essential information of aclient.Client ID
- The
Client IDspecifies theINDEXvalue associated with the specificclient, relative to the position of thePersonCardin thePersonListPanel.- The user will utilize the
Client IDas an argument to run certain commands, such asdeleteclientandeditclient.Client Name
- This box specifies the
nameof theclient.Client Phone Number
- This box specifies the
phonenumber of theclient.Client Email
- This box specifies the
client.Client Appointment
- This box specifies the
DateandTimeof anAppointmentwith the relevantclient.Client Tags
- The green ribbons in the box define a tag for the c
client name.
Our team has accounted for this as we do not wish to enforce arbitrary limits on the user. To account for this, we have implemented proper UI/UX design to wrap the overflown text. Additionally, the
moreinfo command allows users to view the
fully expanded details of their client.
- ListingListPanel
- This component mirrors the design implementation of
PersonListPanel. - The
ListingListPanelcontains thelistingsstored in EZSTATES. - The information of a relevant
listingis displayed using theListingCardcomponent - The
ListingListPanelis a view ofListingCardcomponents. - Commands such as
showlistingsdisplays all possiblelistingsin theListingsListPanel. - A newly added
listingis added to the bottom of theListingListPanel.
- This component mirrors the design implementation of
ListingCard
- The
ListingCardis the component that displays the essential information of alisting.Listing ID
- The
Listing IDspecifies theINDEXvalue associated to the specificlistingrelative to the position of theListingCardin theListingListPanel.- The user will utilise the
Listing IDas an argument to run certain commands such asdeletelistingandeditlisting.Listing Name
- This box specifies the
nameof thelisting.Listing Price
- This box specifies the
priceof thelisting.Listing Area
- This box specifies the
areaof thelisting.Listing Address
- This box specifies the
addressof thelisting.Listing Seller
- This box specifies the
sellerof thelisting.- There can be only one
sellerfor eachlisting.- Every
listingmust have oneseller.Listing Buyers
- This box specifies the
buyersof thelisting.- There can be more than one
buyerfor eachlisting.Listing Region
- This box specifies the
regionof thelisting.
Listing Region color pattern follows the same colour scheme as the Mass Transportation System (MRT) in
Singapore.
- Status Bar Footer
- This component is a visual element located at the bottom of the
MainWindow - The
StatusBarFootercontains a button to access theChatWindowvia GUi means.
- This component is a visual element located at the bottom of the
HelpWindow Design
The HelpWindow can be accessed by pressing the F1 keyboard shortcut or by utilising the help command in the
CommandBox.
The window is split into two areas. One area is the link to the EZSTATES user guide. The other area displays a scrollable view of the common commands in EZSTATES.

HelpWindow Implementation
The HelpWindow is a view that contains the User Guide Link and displays some Common Commands.
- User Guide Link
- The text on the left of the buttons contains the relevant
HELP_MESSAGEwhich is a link to the EZSTATES user guide. - The first
Buttonwhich writesCopy URLcopies the URL of the link in theHELP_MESSAGEonto the user’s clipboard. - The second
Buttonwhich writesOpen in Browseropens the link in theHELP_MESSAGEin the user’s default browser.
- The text on the left of the buttons contains the relevant
- Common Commands
- This scrollable view below the User Guide Link describes the common commands of EZSTATES in a
TextArea.
- This scrollable view below the User Guide Link describes the common commands of EZSTATES in a
ChatWindow Design
The ChatWindow is a chatbot that can be opened by entering the chatbot command or by pressing the Chat with us! button
in the bottom right corner of the application.
Upon accessing this feature, a new window opens with 3 main components:chatArea, userInput and Send.
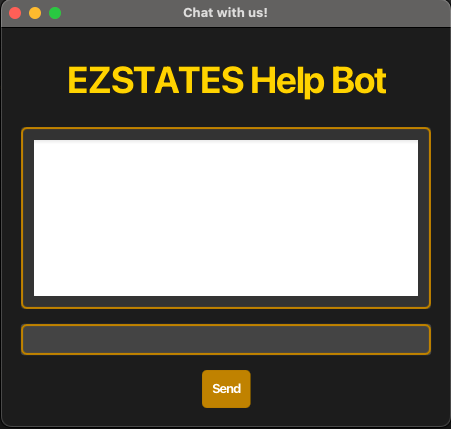
The chatArea displays the conversation between the user, identified by the header You: at the front of each sentence, and
the chatbot, identified by the Assistant: at the front of each sentence.
The userInput is an input field where the user can enter a prompt to the chatbot. The prompt can be sent to the chatbot
either by pressing ENTER on the keyboard or by pressing the Send button.
The Send button sends the prompt written in the userInput to the chatbot. The button does not send empty inputs to the
chatbot.
Firstly, when the
ChatWindow is opened, the user can immediately start typing in the userInput without having to
click on the inputArea. This works for subsequent prompts as well.
Secondly, the chatbot can be closed by prompting the bot with a
bye message.
ChatWindow Implementation
-
chatArea- Utilises if-else logic and validity checks to determine what response the chatbot
should reply to a certain prompt. The logic that is reponsible for the chatbot’s response is
getResponse().
- Utilises if-else logic and validity checks to determine what response the chatbot
should reply to a certain prompt. The logic that is reponsible for the chatbot’s response is
-
getResponse()- Method in
ChatWindowthat returns a response based on the user’s input. - The method utilises regular expressions to identify specific keywords and actions within the user’s message.
- For each command, the method provides a usage example and syntax as a response.
- Method in
-
userInput- A
TextFieldthat sends the user prompt to thegetResponse()method.
- A
-
Send- A button to send the
userInputthrough GUI means.
- A button to send the
MoreInfoWindow Design
The MoreInfoWindow provides additional information to the user. The window can be accessed using the moreinfo command
and an appropriate INDEX argument. The window can be closed by entering the ESC button or by closing the window using
the cursor.
When opened, this window shows the same fields in the PersonCard but in greater detail. This is achieved
by displaying the fields with greater length to provide a complete overview of the client details
to the user.

Additionally, there is a clientRemarksLabel and remarkInput which provides users with another field
to specify characteristics or information about their client which can be hidden from the MainWindow as this
remark is only displayed within the MoreInfoWindow.
clientRemarksLabel allows a maximum of 400 characters to be entered. This was chosen due to the small space
allocated for the remarks, which is a trade-off made to display other relevant client information.
Additionally, the
clientRemarksLabel is saved in EZSTATES when the application is closed and preserved when it is opened.
MoreInfoWindow Implementation
MoreInfoWindow utilises the MoreInfoController class to handle the logic and UI rendering of the window.
MoreInfoWindow sets up a new Stage to display the client details in a separate window, loads the .FXML file and binds
it to the MoreInfoController. MoreInfoWindow then passes the client to the MoreInfoController.
MoreInfoController handles client fields, the client picture and the user’s remarkInput.
ConfirmationDialog Design
The ConfirmationDialog is a window that opens when the user utilises the deleteclient command.
This window requests the user to make a Yes/No decision to confirm the deletion of the client.
The window displays the name of the client and that the client has an active listing. A client has an active listing
if he/she is a seller of a listing.
client without an active listing will not open a ConfirmationDialog window upon deletion.
This window is developed as a fail-safe for users to protect against deletions of clients that is a seller of a listing
since a listing cannot exist without its seller.
ConfirmationDialog window can be interacted with fully
keyboard-only inputs.
In the window, the user can navigate between the Yes/No buttons using the
LEFT ARROW < and RIGHT ARROW > keys. To confirm their
decision, they can do so by pressing ENTER. Additionally, they can also exit the window by using the ESC key.
ConfirmationDialog Implementation
Similar to the MoreInfoWindow implementation, the ConfirmationDialog utilises the ConfirmationDialogController to handle the logic
and UI rendering of the window.
ConfirmationDialog sets up a new Stage to display the delete confirmation in a separate window, loads the .FXML file and binds
it to the ConfirmationDialogController. Window then passes the client to the MoreInfoController.
MoreInfoController handles the logic for which button has been pressed by the user and displays the client name in the window.
This approach keeps the code modular and organized through the Separation of Concerns design principle.
The
Window class handles the window setup and layout loading exclusively while the Controller class manages all
UI interactions and dynamically updates the UI utilising set methods. By dividing responsibilities between classes, this
simplifies code, improves maintainability and enhances reusability.
Logic component
API : Logic.java
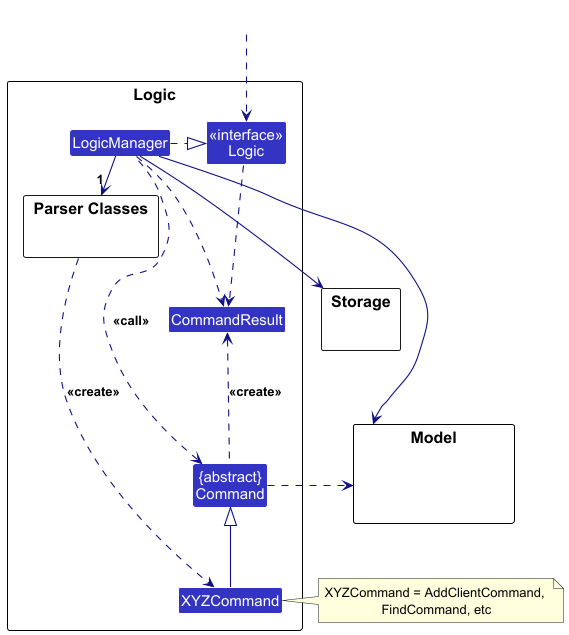
Here’s a (partial) class diagram of the Logic component:
The sequence diagram below illustrates the interactions within the Logic component, taking execute("deleteclient 1") API call as an example.

DeleteCommandParser should end at the destroy marker (X) but due to a limitation of PlantUML, the lifeline continues till the end of diagram.
How the Logic component works:
- When
Logicis called upon to execute a command, it is passed to anEzstatesParserobject which in turn creates a parser that matches the command (e.g.,DeleteClientProfileCommandParser) and uses it to parse the command. - This results in a
Commandobject (more precisely, an object of one of its subclasses e.g.,DeleteClientProfileCommand) which is executed by theLogicManager. - The command can communicate with the
Modelwhen it is executed (e.g. to delete a person).
Note that although this is shown as a single step in the diagram above (for simplicity), in the code it can take several interactions (between the command object and theModel) to achieve. - The result of the command execution is encapsulated as a
CommandResultobject which is returned back fromLogic.
Here are the other classes in Logic (omitted from the class diagram above) that are used for parsing a user command:
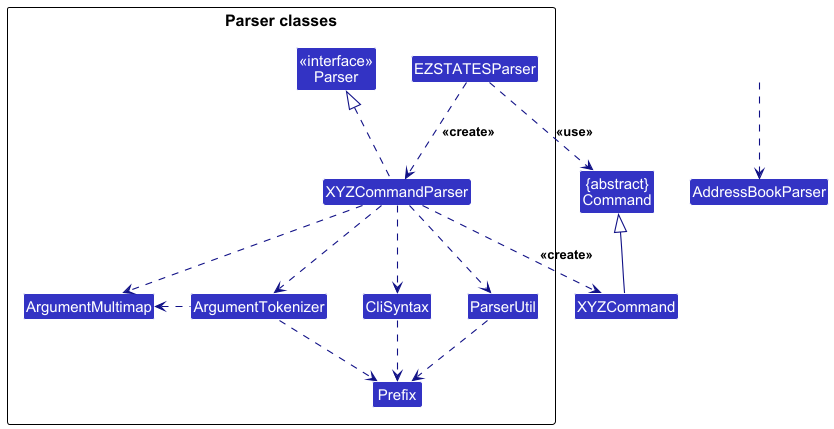
How the parsing works:
- When called upon to parse a user command, the
EzstatesParserclass creates anXYZCommandParser(XYZis a placeholder for the specific command name e.g.,AddListingCommandParser) which uses the other classes shown above to parse the user command and create aXYZCommandobject (e.g.,ListingCommand) which theAddressBookParserreturns back as aCommandobject. - All
XYZCommandParserclasses (e.g.,AddCommandParser,DeleteCommandParser, …) inherit from theParserinterface so that they can be treated similarly where possible e.g, during testing.
Model component
API : Model.java
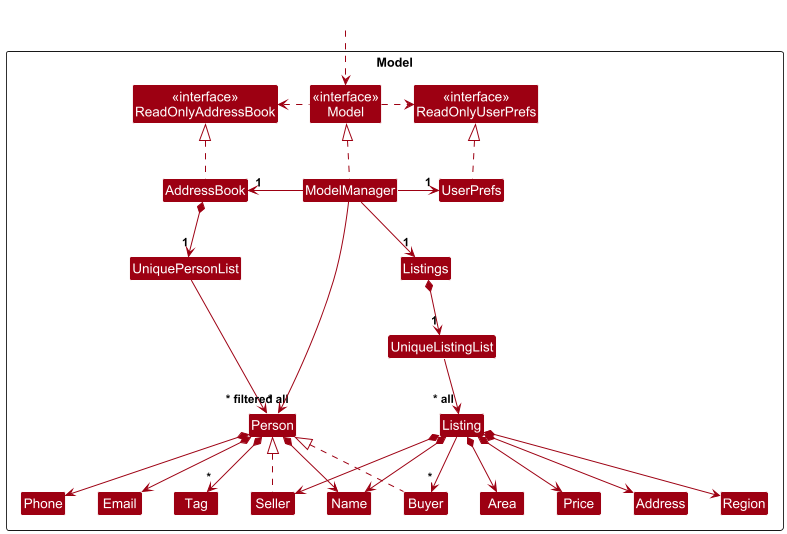
The Model component,
- stores the EZSTATES data i.e., all
Personobjects (which are contained in aUniquePersonListobject) and allListingobjects (which are contained in aUniqueListingListobject). - stores the currently ‘selected’
Personobjects (e.g., results of a search query) as a separate filtered list which is exposed to outsiders as an unmodifiableObservableList<Person>that can be ‘observed’ e.g. the UI can be bound to this list so that the UI automatically updates when the data in the list change. - stores a
UserPrefobject that represents the user’s preferences. This is exposed to the outside as aReadOnlyUserPrefobjects. - does not depend on any of the other three components (as the
Modelrepresents data entities of the domain, they should make sense on their own without depending on other components)
Tag list in the AddressBook, which Person references. This allows AddressBook to only require one Tag object per unique tag, instead of each Person needing their own Tag objects.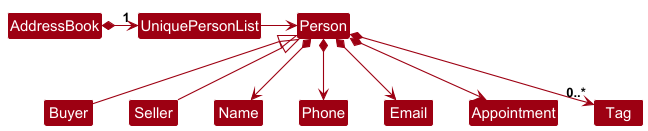
Storage component
API : Storage.java
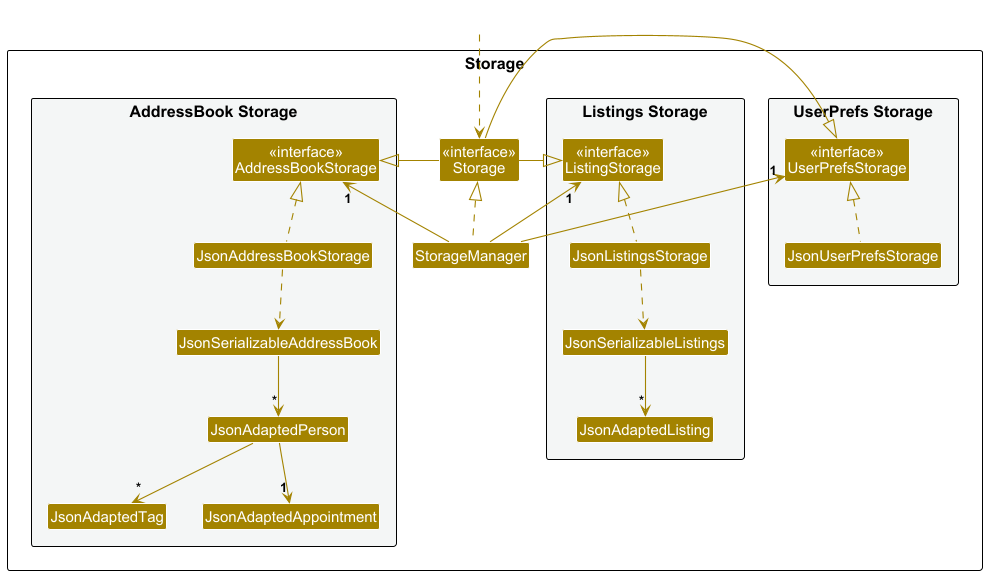
The Storage component,
- can save both address book data and user preference data in JSON format, and read them back into corresponding objects.
- inherits from both
AddressBookStorageandUserPrefStorage, which means it can be treated as either one (if only the functionality of only one is needed). - depends on some classes in the
Modelcomponent (because theStoragecomponent’s job is to save/retrieve objects that belong to theModel)
Common classes
Classes used by multiple components are in the seedu.address.commons package.
Continuous Integration (CI)
Continuous Integration in this project is done through 4 means:
- Unit testing
- Automated UI testing
- Automated Github testing
- Code coverage reports
Github Actions utilises
.yaml configuration files and can be found in the .github/workflows folder.
Github Actions operate in this manner:
1. Trigger: Github Actions workflows are triggered but events such as
push and pull_request.2. Jobs and Runners: A workflow consists of one or more jobs, each containing a series of steps. Each job runs on a Github-hosted runner (a virtual machine or environment) to perform the defined tasks.
3. Steps: Within each job, steps are defined to execute certain tasks, such as installing dependencies, running tests, or building the application.
4. Feedback: After a workflow completes, Github Actions provide feedback on the success or failure of each job. Developers receive notifications for failed workflows, allowing them to quickly address issues before merging or deploying code.
5. Deployment: Once a workflow has succeeded, Github Actions can deploy the application, ensuring that only thoroughly tested code reaches users. By utilising Github Actions, EZSTATES maintains high code quality and reliability, facilitating efficient collaboration and timely deployment of updates.
Unit testing
Unit testing covers non-UI related components of EZSTATES, such as model, storage, logic and utility classes.
The dependencies used for Unit Testing is JUnit 5.
Automated UI testing
Automated UI testing helps to simulate user interactions, ensuring that the UI is working as intended.
The dependencies used for automated UI testing is JUnit 5 and TestFX.
Automated Github testing
Automated Github testing is trigged or every push and pull request made to the Github remote repository and is conducted on all 3 major OSes: MacOS, Windows and Ubuntu.
Code coverage reports
Code coverage reports are provided to developers in two methods: JaCoCoTest reports and CodeCov reports.
JaCoCoTest reports are generated using build.gradle and CodeCov reports are generated on every Github Workflow.
As of v1.5.2 release, the test coverage for EZSTATES is 95%.
Usage:
- JaCoCoTest reports
- Configuration: The JaCoCo plugin is configured in
build.gradle. - Running reports: To generate a JaCoCo report, run either of these commands in your terminal:
.gradlew/ jacocoTestReportto run all unit tests and automated UI tests
OR
.graldew/ buildwhich runs all tests, incuding unit tests, autoamted UI tests and checkstyle tests. - Usage: JaCoCo reports offer a local overview of which classes and methods are covered. Developers are encouraged to review these reports after each set of tests, especially before merging any significant changes. The HTML report highlights area needing additional tests.
- Configuration: The JaCoCo plugin is configured in
- CodeCov reports
- Configuration: To configure CodeCov, a
.yamlworkflow file is set up within the.github/workflowsdirectory of the repository. - Running reports: CodeCov reports are automatically generated and uploaded with each push or pull_request event as configured in the GitHub Actions workflow. After each run, the workflow will produce a detailed reporton CodeCov, accessible through links provided in the Github pull request page.
- Usage: CodeCov reports provide information on whether coverage has improved or decreased and highlight specific lines or files affected by new or modified code.
Additionally, CodeCov offers visualization tools for in-depth inspection of coverage across functions and classes, allowing developers to target untested areas in their testing efforts.
- Configuration: To configure CodeCov, a
Features and Implementation
Client Management
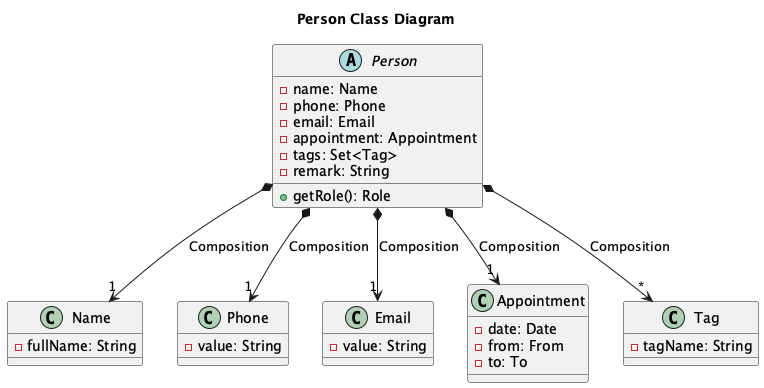
All clients are Persons in EZSTATES. A Person is an abstract class which consists of 6 essential fields and 1
essential abstract method getRole().
Role
- The
Roleclass specifies what responsibilites a client has. - The class is designed using Enumerations.
- As of v1.5.2, EZSTATES supports 2
Roles:BUYERandSELLER.
Essential Fields:
-
name: The name of a Person, defined by theNameclass. -
phone: The phone number of a Person, defined by thePhoneclass. -
email: The email address of a Person, defined by theEmailclass. -
appointment: An expected appointment the user has with a Person, defined by theAppointmentclass. -
tags: A collection of short comments or descriptions of a Person, defined by a set ofTags. -
remark: A string which represents an additional remark about a Person. This field is used in theMoreInfofeature.
Essential Methods:
-
getRole(): Classes that represent clients must inherit the abstractPersonclass and are required to implement thegetRole()method. This ensures that all clients have a specifiedrole.Roleshelp developers differentiate various tasks and associations with features such aslistingsandgetRole()is a basic getter to facilitate this logic.
Add client
As mentioned in the Logic segment, a command is passed to the LogicManager and then parsed in the
EzstatesParser where the relevant XYZCommandParser is created and subsequently the XYZCommand is created. To facilitate
the usage of roles, a centralized AddClientProfileParser and AddClientProfileCommand is used when a client with any role is being
created.
-
Add buyer
Overview
 The
The buyercommand adds aBuyerto EZSTATES.Buyerinherits thePersonclass and is associated with aBUYERrole.
Implementation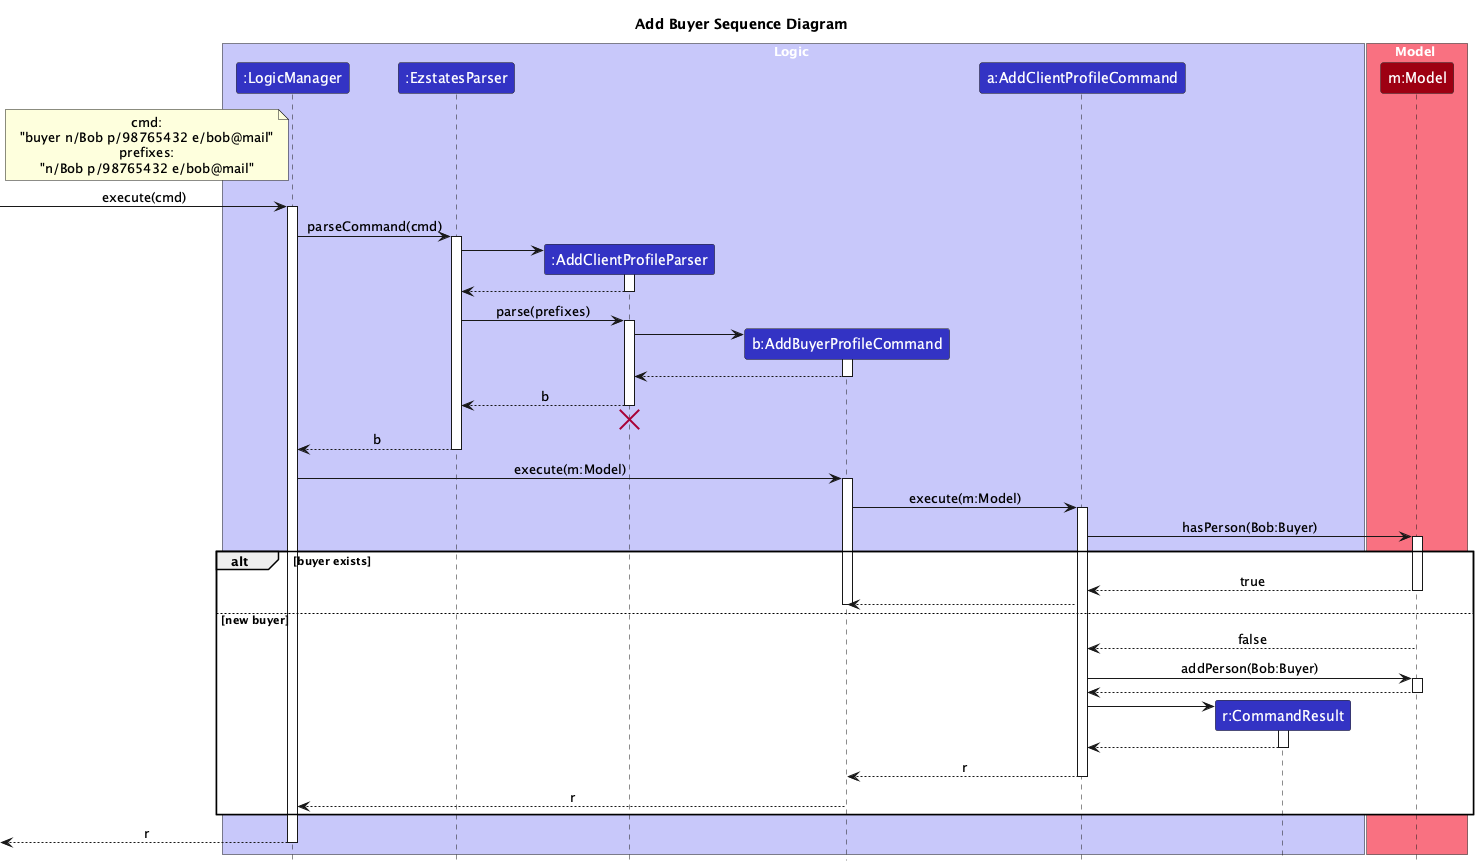
- User runs a
buyercommand with valid inputs. - Command is parsed by
EzstatesParserand aAddClientProfileParseris created to parse thebuyercommand which creates aAddBuyerProfileCommandthat implicitly createsAddClientProfileCommand. -
AddClientProfileCommandhandles the logic to detect duplicateBuyer. Abuyeris added to theModelif it is a newbuyer, else aCommandExceptionis thrown. -
Finally,
AddClientProfileCommandreturns aCommandResult, which encapsulates a response to the user’s input. -
Add seller
Overview
Thesellercommand adds aSellerto EZSTATES.Sellerinherits thePersonclass and is associated with aSELLERrole.
Implementation
The execution ofsellercommand mirrors the execution of thebuyercommand.- User runs a
sellercommand with valid inputs. - Command is parsed by
EzstatesParserand aAddClientProfileParseris created to parse thebuyercommand which creates aAddSellerProfileCommandthat implicitly createsAddSellerProfileCommand. -
AddClientProfileCommandhandles the logic to detect duplicateSeller. Aselleris added to theModelif it is a newseller, else aCommandExceptionis thrown. - Finally,
AddClientProfileCommandreturns aCommandResultwith a corresponding success message.
- User runs a
- User runs a
Edit client
Overview
The editclient command edits a client.
Implementation
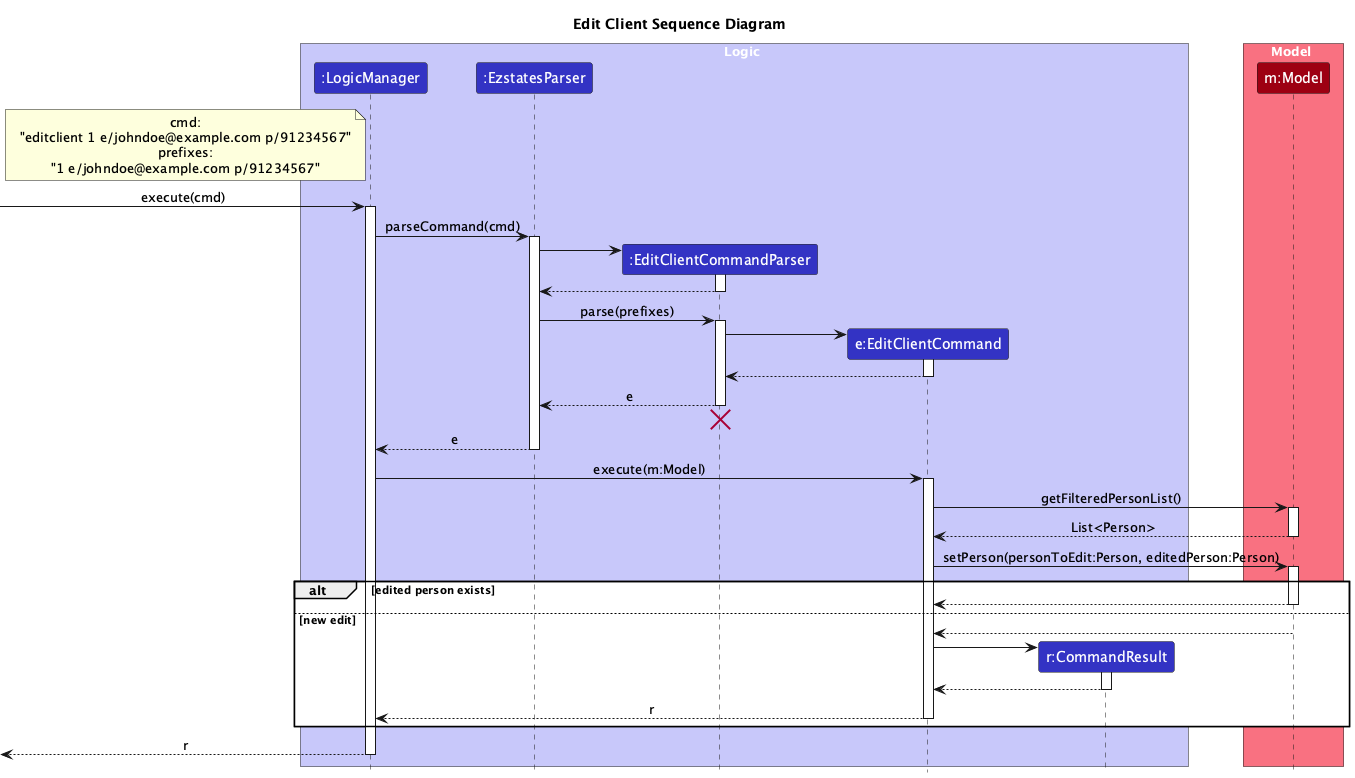
- User runs a
editclientcommand with validINDEXand valid prefixes. - Command is parsed by
EzstatesParserand aEditClientCommandParseris created to parse theeditclientcommand which createsEditClientCommand. -
EditClientCommandcreates a newEditPersonDescriptorand uses it to create a newPerson -
EditClientCommandretrieves the list ofPersonsfromModeland attempts to set the newly createdPersonusingsetPerson(). -
setPerson()creates a new editedPersonwith the edited fields. If this newPersonalready exists, aCommandExceptionis thrown, else it the originalPersonis removed from theModeland the new one is added. - Finally,
EditClientCommandreturns aCommandResultwith a corresponding successs message.
Person instead of editing the original Person?
All objects including Person objects in EZSTATES are desgined to be immutable.
When objects are immutable, modifying one instance does not risk unintentionally
altering other references to that instance elsewhere in the program.
This behavior prevents side effects, especially when other components hold references to Person objects,
as modifying shared instances can lead to unexpected and hard-to-track bugs.
This also ensures that intended side effects are accounted for, such as editing a client who is associated to
a listing.
Find client
Overview
The find command finds and lists all Persons whose name contains any of the input keywords.
Implementation

- User runs a
findcommand with keywords. - Command is parsed by
EzstatesParserand aFindClientCommandParseris created to parse the keywords which createsFindClientCommandand aNameContainsKeyWordsPredicate, that contains a list of the user’s keywords. -
FindClientCommandupdates theModelwith the given predicate to filter the list ofPersonsthat contain any of the keywords. - Finally,
FindClientCommandreturns aCommandResultwith a corresponding success message.
Delete client
Overview
The deleteclient command deletes a Person according to the INDEX that is on the PersonListPanel.
Implementation
- User runs a
deleteclientcommand with anINDEXas argument. - Command is parsed by
EzstatesParserand aDeleteClientCommandParseris created to parse the argument which creates aDeleteClientCommand. -
DeleteClientCommandretrieves the list ofPersonsfromModeland checks if the specifiedPersonexists and then deletes thePersononce the user confirms his deletion. - Finally,
DeleteClientCommandreturns aCommandResultwith a corresponding success message.
Show client
Overview
The showclient command displays all clients in EZSTATES to the user.
Implementation
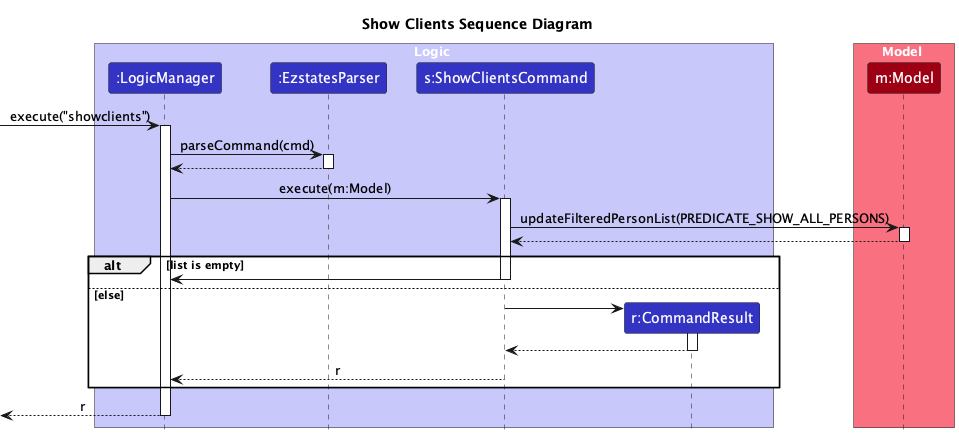
- User runs a
showclientcommand. - Command is parsed by
EzstatesParser, which creates aShowClientCommand, skipping the creation of a specificParserinstance. -
ShowClientCommandretrieves the list ofPersonsfrom theModelwithPREDIATE_SHOW_ALL_PERSONSsuch that theModelreturns allPersons. - If there are no
Personsin the list, aCommandExceptionis thrown, else aCommandResultis returned with a corresponding success message.
Clear
Overview
The clear command clears all Persons and Listings from EZSTATES.
Implementation
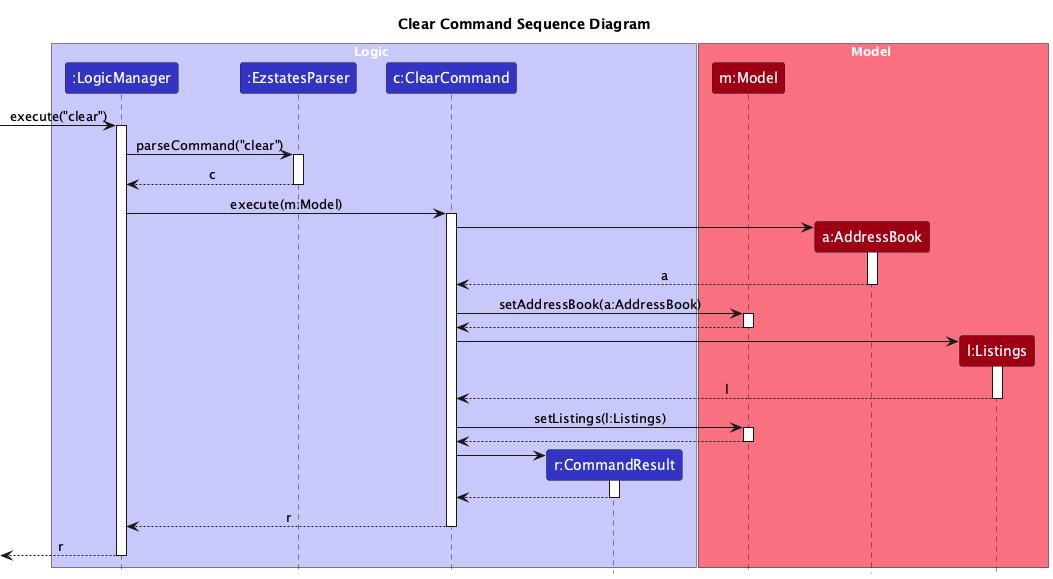
- User runs a
clearcommand. - Command is parsed by
EzstatesParser, which creates aCLearCommand, skipping the creation of a specificParserinstance. -
ClearCommandalways sets theModel'sstorage to a newAddressBookwhich storesPersonsand a newListingswhich storesListings. - A
CommandResultis returned with a corresponding success message.
Appointment Management

The Appointment class represents an appointment in the address book.
Appointment comprises of one Date, From and To each. Each of these classes represent the date of an appointment, the start time
of an appointment and the end time of an appointment respectively.
Add appointment
Overview
An Appointment can be added to a Person using the apt command.
Implementation
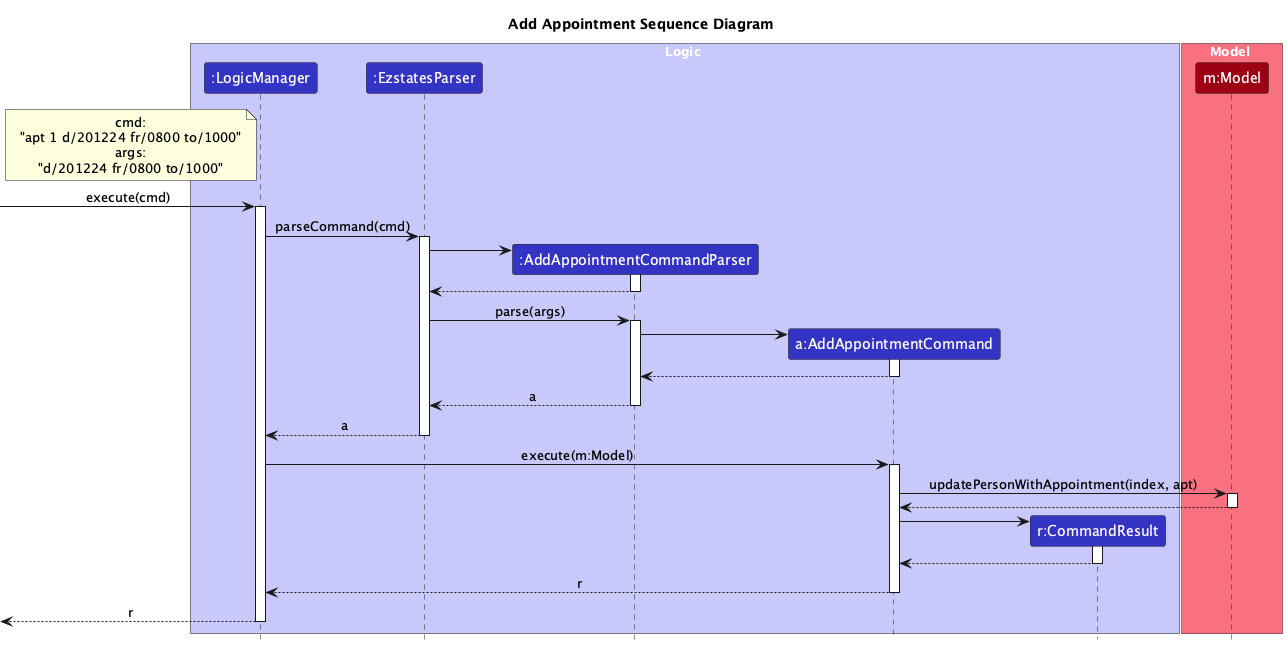
- User runs a
aptcommand with a valid index. - Command is parsed by
EzstatesParserwhich creates aAddAppointmentCommandParserthat parses the user’s arguments. Parsing a valid input createsAddAppointmentCommandwith the relevant arguments. - The
AddAppointmentCommandretrieves the relevantPersonfrom theModeland creates a newPersonwith the user’sAppointment. - The original
Personis removed and the newPersonis added in its place. - Finally,
AddAppointmentCommandreturns aCommandResultwith the corresponding success message.
Appointment, Date, From and To?
Every Person is created without an Appointment.
The static EMPTY fields, such as EMPTY_APPOINTMENT in Appointment, follow the Singleton pattern
to represent a null or empty state, providing a single, globally accessible instance for cases where an Appointment is absent.
Delete appointment
Overview
The deleteapt command deletes an Appointment from a Person.
Implementation
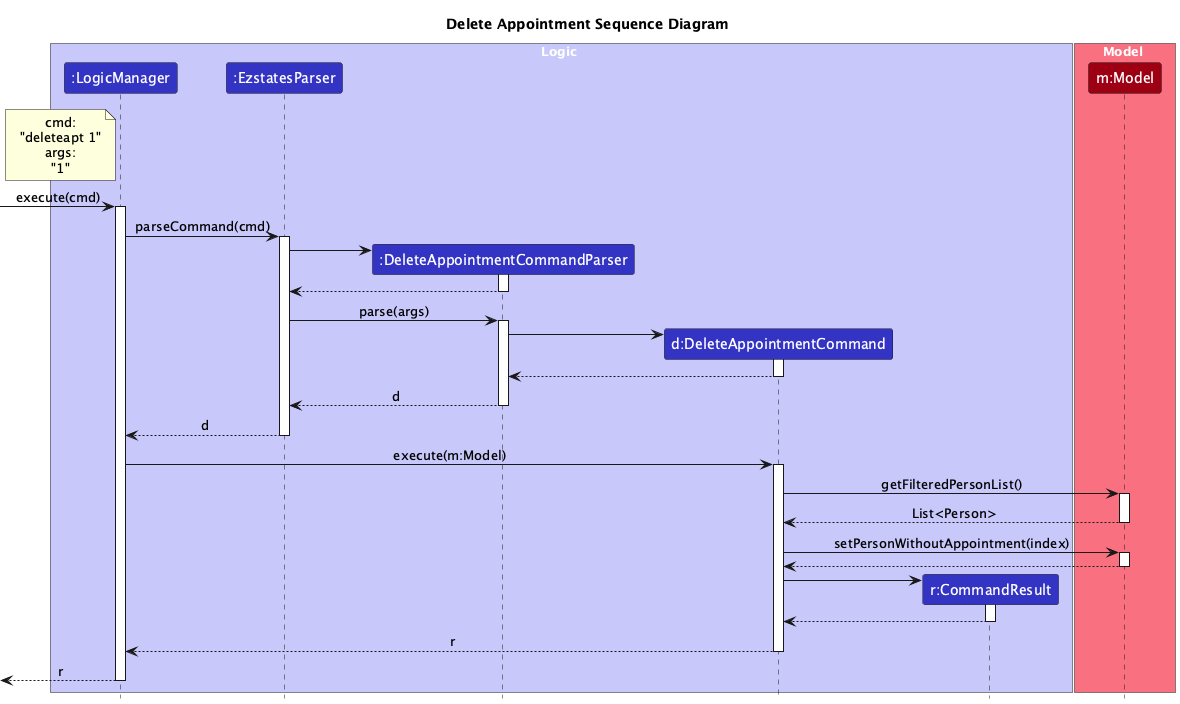
- User runs a
deleteaptcommand with anINDEXas argument. - Command is parsed by
EzstatesParserand aDeleteAppointmentCommandParseris created to parse the argument which creates aDeleteAppointmentCommand. -
DeleteAppointmentCommandretrieves the list ofPersonsfromModeland checks if the specifiedPersonexists and creates a newPersonwith theEMPTY_APPOINTMENTsingleton. - The original
Personis deleted and newPersonis added to the list ofPersons. - Finally,
DeleteAppointmentCommandreturns aCommandResultwith a corresponding success message.
Today
Overview
The today command lists all the Appointments that the user has made today.
Today is defined as the current time on the user’s operating system.
Implementation
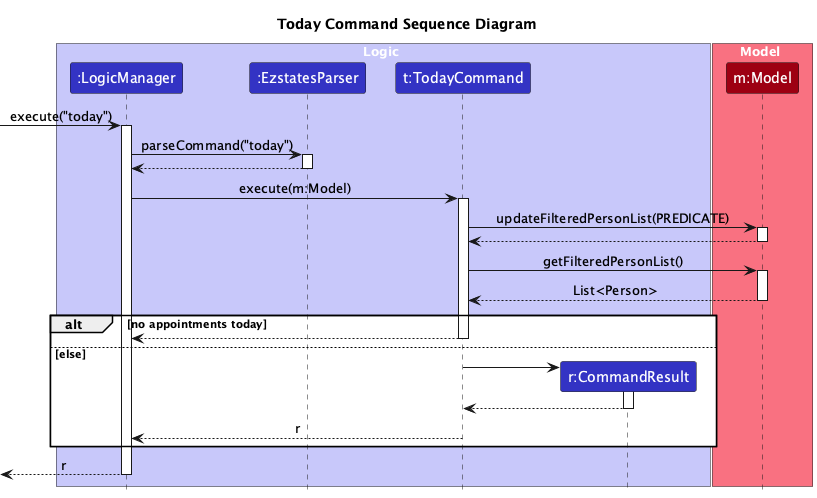
- User runs a
todaycommand. - Command is parsed by
EzstatesParser, which creates aTodayCommand, skipping the creation of a specificParserinstance. -
TodayCommandretrieves the list ofPersonsfrom theModelwith aHasAppointmentTodayPredicatewhich returns a list ofPersonswith appointments scheduled for today. - If there are no
Personsin this list, aCommandExceptionis thrown, else aCommandResultis returned with a corresponding success message.
Listing Management
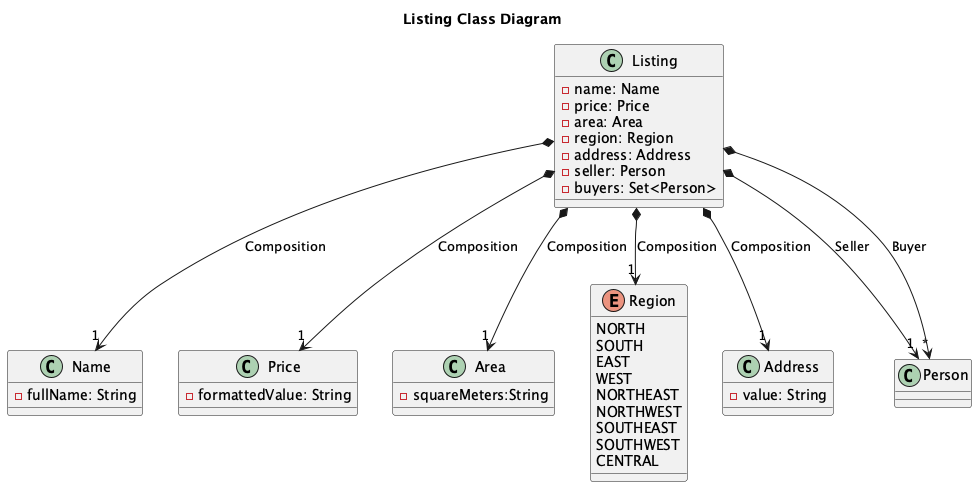
A Listing contains the necessary information of a property made by a Seller.
A Listing contains the mandatory fields:
-
name: The name of alisting, defined by theNameclass. -
price: The price of alisting, defined by thePriceclass. -
area: The area of the property in thelisting, defined by theAreaclass. -
region: Theregionof the property in thelisting, defined by theRegionenumerations. -
address: Theaddressof the property in thelisting, definted by theAddressclass. -
seller: Thesellerof the property in thelisting.
A listing can also contain buyers, but can have any non-negative amount of buyers.
Add listing
Overview
The listing command adds a listing to EZSTATES.
Implementation

- User runs the
listingcommand with the required property details (e.g., name, price, area, region, address, seller). - The
EzstatesParserparses this command and creates anAddListingCommandinstance containing the provided details. -
AddListingCommanduses these details to create a newListingobject. -
AddListingCommandthen calls theModelto add the newly created Listing to the system. - If the addition is successful, a
CommandResultis returned with a success message. If there are validation issues or missing required fields, aCommandExceptionis thrown with an appropriate error message.
Edit listing
Overview
The editlisting edits a listing.
Implementation
- User runs a
editlistingcommand with validINDEXand valid prefixes. - Command is parsed by
EzstatesParser, and aEditListingCommandParseris created to parse the arguments which creates anEditListingCommand. -
EditListingCommandcreates a newEditListingDescriptorand uses it to create a newListing -
EditListingCommandthen retrieves the list ofListingsfromModeland attempts to set the newly createdListingusingsetListing() - If the newly created
Listingalready exists, aCommandExceptionis thrown. Else, the originalListingis removed and replaced with the new one. - Finally,
EditListingCommandreturns a CommandResult with a corresponding success message.
Add buyers to listing
Overview
The addlistingbuyers command adds buyers to a listing.
Implementation
- User runs a
addlistingbuyerscommand with validINDEXand valid prefixes. - Command is parsed by
EzstatesParser, and aAddBuyersToListingCommandParseris created to parse the arguments which creates anAddBuyersToListingCommand. -
AddBuyersToListingCommandretrieves the list ofPersonsfromModeland checks for the validity of its arguments (check the validity of the Buyers that it receives). - An updated
Listingis created with the correct Buyers added to it. -
AddBuyersToListingCommandthen retrieves the list ofListingsfromModeland attempts to set the newly createdListingusingsetListing() - If the newly created
Listingalready exists, aCommandExceptionis thrown. Else, the originalListingis removed and replaced with the new one. - Finally,
AddBuyersToListingCommandreturns a CommandResult with a corresponding success message.
Remove buyers from listing
Overview
The removelistingbuyers command adds buyers to a listing.
Implementation
- User runs a
removelistingbuyerscommand with validINDEXand valid prefixes. - Command is parsed by
EzstatesParser, and aRemoveBuyersFromListingCommandParseris created to parse the arguments which creates anRemoveBuyersFromListingCommand. -
RemoveBuyersFromListingCommandretrieves the list ofPersonsfromModeland checks for the validity of its arguments (check the validity of the Buyers that it receives). - An updated
Listingis created with the correct Buyers added to it. -
RemoveBuyersFromListingCommandthen retrieves the list ofListingsfromModeland attempts to set the newly createdListingusingsetListing() - If the newly created
Listingalready exists, aCommandExceptionis thrown. Else, the originalListingis removed and replaced with the new one. - Finally,
RemoveBuyersFromListingCommandreturns a CommandResult with a corresponding success message.
Delete listing
Overview
The deletelistings command deletes a listing.
Implementation
- User runs the
deletelistingcommand with the specific listing identifier or index. - The
EzstatesParserparses this command and creates aDeleteListingCommandinstance with the provided identifier. -
DeleteListingCommandaccesses theModelto retrieve theListingassociated with the identifier. If the listing is found, it proceeds to delete it. - If the
Listingis not found, aCommandExceptionis thrown with an appropriate message. - Upon successful deletion, a
CommandResultis returned with a confirmation message indicating the listing has been deleted.
Show listing
Overview
The showlistings command shows all listings.
Implementation
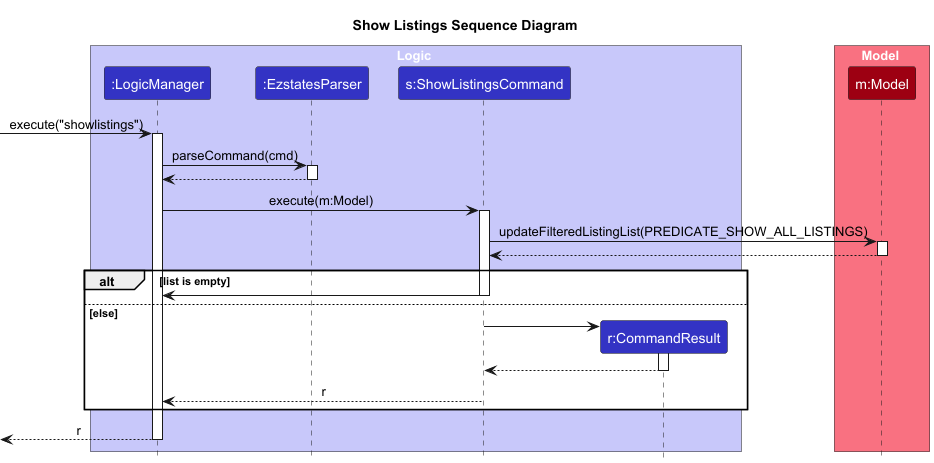
- User runs the
showlistingscommand. - The
EzstatesParserparses this command and creates aShowListingsCommandinstance. -
ShowListingsCommandaccesses the Model to retrieve the complete list of Listings. - If there are no Listings available, a
CommandResultis returned with a message indicating that no listings are available. - If listings exist, a
CommandResultis returned displaying the list of Listings along with a success message.
Clear listing
Overview
The clearlisting clears all listings.
Implementation
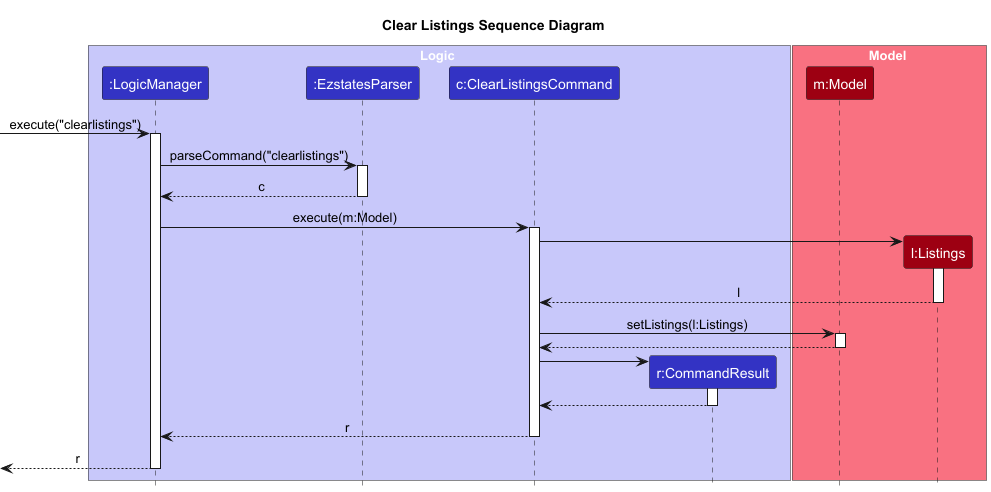
- User runs the
clearlistingcommand. - The
EzstatesParserparses this command and creates aClearListingsCommandinstance. -
ClearListingsCommandaccesses the Model and calls the clearAllListings() method to delete all listings from the system. - If there are no listings to clear, a
CommandResultis returned with a message indicating that no listings were available to clear. - If listings are successfully cleared, a
CommandResultis returned with a success message confirming that all listings have been removed.
Find Listing
Overview
The findlisting command searches for and lists all Listings where the listing name contains any of the specified keywords.
Implementation
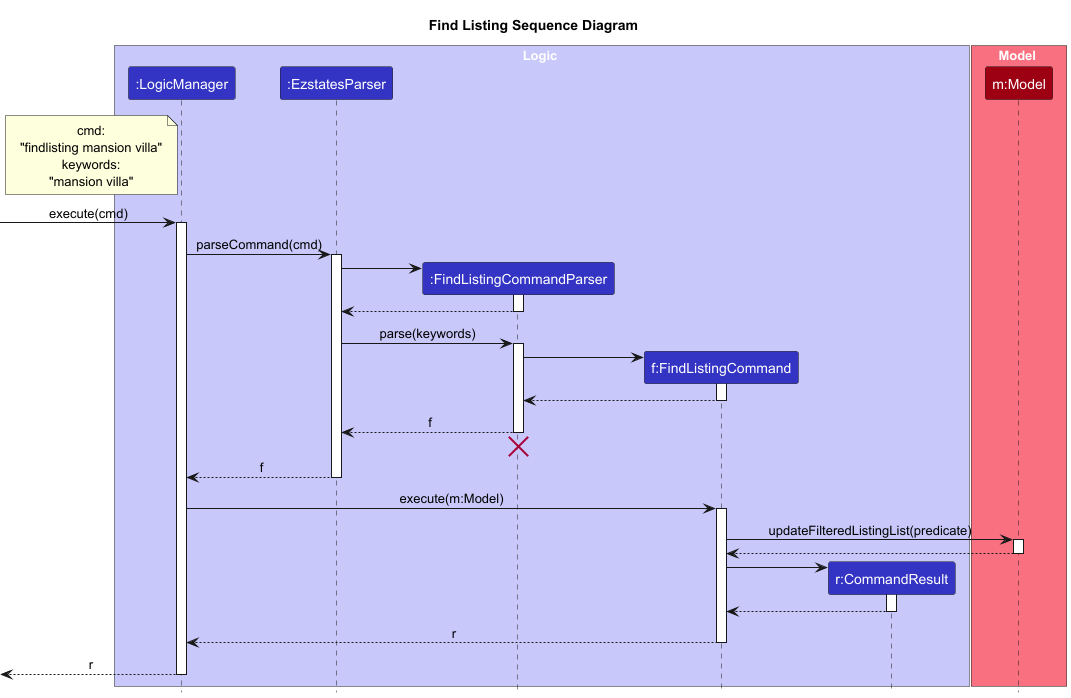
- User runs the
findlistingcommand with one or more keywords. - The
EzstatesParserparses this command and creates aFindListingCommandParserinstance, which processes the keywords and creates aFindListingCommandwith aListingNameContainsKeywordsPredicatethat contains the user’s keywords. -
FindListingCommandupdates the Model with the given predicate to filter the list ofListingsbased on names that match any of the provided keywords. - If listings matching the keywords are found,
FindListingCommandreturns aCommandResultwith a success message and the filtered list. If no matches are found, it returns a message indicating no listings match the search criteria.
Utility
Chat Window
Overview
The chatbot command opens the ChatWindow UI component, which is a conversation bot that is able to answer
prompts from the user.
Implementation
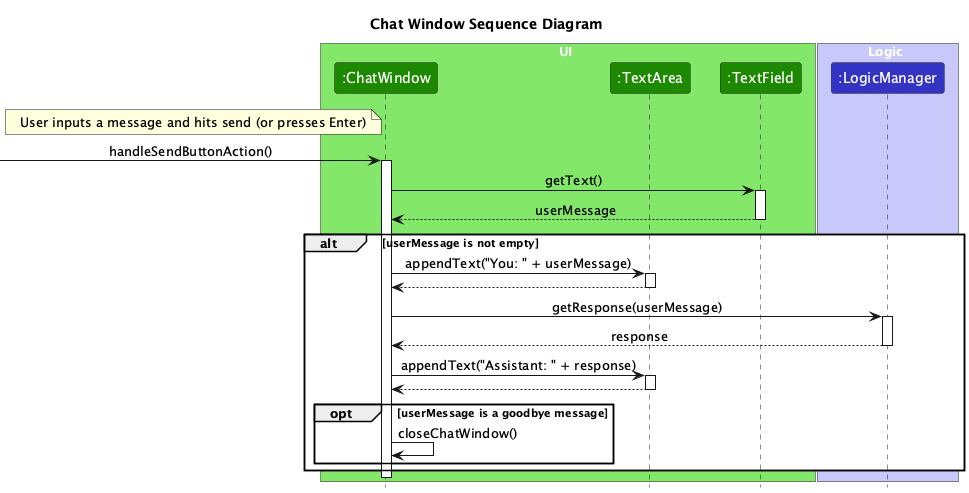 The Sequence diagram above depicts how the user interacts with the UI when the
 chatbot command is used
and how Logic responds to the user’s prompts.
- User types a message in the
ChatWindowand pressesEnteror clicks the send button. - The
ChatWindowretrieves the message from theTextField. If the message is not empty, it appends the user’s message to theTextArea. - The
ChatWindowsends the message to theLogicManager, which processes the input and returns a response. - The response is appended to the
TextAreain the chat interface. - If the message is recognized as a goodbye, the
ChatWindowinitiatescloseChatWindow()to end the session.
Help
Overview
The help command opens the HelpWindow UI component.
Implementation
- User opens the
HelpWindowby issuing thehelpcommand. -
HelpWindowis displayed, presenting a list of common commands and a link to the user guide. - The user has the option to:
- Copy the user guide URL to the clipboard by pressing the
Copybutton. - Open the user guide in their default browser by pressing the
Open in Browserbutton.
- Copy the user guide URL to the clipboard by pressing the
-
HelpWindowlogs the action and waits for further interactions or can be closed by the user.
Exit
Overview
The exit command exits the application.
Implementation
- User issues the
exitcommand to terminate the application. - The
exitcommand is passed toLogicManager, which invokes theExitCommand. -
ExitCommandcreates aCommandResultwith a confirmation message, setting an exit flag to signal application termination. - The main application controller detects the exit flag and proceeds to shut down the application.
Git Commit Script
This is a locally ran script for developers to enforce the Git Conventions. The script stops an invalid commit message from being committed. An invalid commit message follows the above mentioned Git Conventions.
- How to use:
- In the project root repository, run the following terminal commands:
./setup.sh - You should see the following in your terminal:
Made hooks/commit-msg executable.
Setup completed: All hooks are now executable. -
ls -l hooks/to verify that the scripts are executable - You should see the following (or something similar in this format) in your terminal:
-rwxr-xr-x 1 user group 1234 Oct 20 15:45 commit-msg -
git config core.hooksPath hooksto ensure that Git is configured correctly to run the script
- In the project root repository, run the following terminal commands:
And you’re done! This script will automatically run whenever you make a git commit!
To stop using the script:
- Run this command in the root project directory:
git config --unset core.hooksPath
This section describes some noteworthy details on how certain features are implemented.
Documentation, logging, testing, configuration, dev-ops
Appendix
Appendix: Requirements
Product scope
Target user profile:
- free-lance real estate agents
- has to manage a large number of clients with varying details
- has to make multiple appointments with various clients
- has to manage multiple listings
- can type fast
- prefers typing to mouse interactions
- is reasonably comfortable using CLI apps
Value proposition: manage client contacts faster than a typical mouse/GUI driven app
User stories
Priorities: High (must have) - * * *, Medium (nice to have) - * *, Low (unlikely to have) - *
| Priority | As a … | I want to … | So that I can… |
|---|---|---|---|
* * * |
tech-savvy property agent | have a place to store my client details | manage my large number of client details |
* * * |
tech-savvy property agent | create a new client profile | store new clients |
* * * |
tech-savvy property agent | delete a client profile | remove clients I no longer serve |
* * * |
tech-savvy property agent | search for a client by name | quickly access the profile of the client of interest |
* * * |
tech-savvy property agent | be able to add my client’s phone number and email to their profile | know how to contact him/her |
* * * |
tech-savvy property agent | create appointments with my clients | manage my appointments with my clients |
* * * |
tech-savvy property agent | delete appointments | remove appointments I have already cleared |
* * |
tech-savvy property agent | assign a status to a client | easily categorise clients by priority |
* * |
tech-savvy property agent | search by appointments | pinpoint which client I am serving for that appointment |
* * |
tech-savvy property agent | be able to keep track of all my appointments | plan out my schedule efficiently |
* * |
tech-savvy property agent | be able to know what appointments I have for the day | make immediate changes to my schedule |
{More to be added}
Use cases
(For all use cases below, the System is EZSTATES and the Actor is the User, unless specified otherwise)
Use Case: Add Buyer
MSS:
- User chooses to add a new buyer.
- System requests buyer details (name, contact info, property interest, etc.).
- User enters the required information.
- System confirms the details and creates the profile.
- System displays a success message.
- Use case ends.
Extensions:
-
3a. System detects missing or incorrect data:
- 3a1. System displays am error and requests valid inputs.
- 3a2. User enters the correct data.
- Steps 3a1–3a2 are repeated until all data is valid.
- Use case resumes from step 4.
Use Case: Add Seller
MSS:
- User chooses to add a new seller profile.
- System requests seller details (name, contact info, property interest, etc.).
- User enters the required information.
- System confirms the details and creates the profile.
- System displays a success message.
- Use case ends.
Extensions:
-
3a. System detects missing or incorrect data:
- 3a1. System displays am error and requests valid inputs.
- 3a2. User enters the correct data.
- Steps 3a1–3a2 are repeated until all data is valid.
- Use case resumes from step 4.
Use Case: Edit Client Profile
MSS:
- User selects an existing client profile to edit.
- System displays the client’s current information.
- User updates the desired fields.
- System confirms the changes and updates the profile.
- System displays a success message.
- Use case ends.
Extensions:
-
3a. User tries to edit a field with invalid data:
- 3a1. System displays an error and requests valid data.
- 3a2. User corrects the data.
- Steps 3a1–3a2 repeat until all data is valid.
- Use case resumes from step 4.
Use Case: Delete Client Profile
MSS:
- User chooses to delete a client profile.
- System asks for confirmation.
- User confirms the deletion.
- System removes the client profile from the database.
- System displays a success message.
- Use case ends.
Extensions:
-
2a. User cancels the deletion:
- 2a1. System aborts the deletion process.
- Use case ends.
Use Case: Add Appointment
MSS:
- User chooses to schedule an appointment for a client.
- System requests appointment details (date, time, location).
- User enters the requested details.
- System confirms the details and saves the appointment.
- System displays a success message.
- Use case ends.
Extensions:
-
3a. System detects a scheduling conflict:
- 3a1. System notifies the user of the conflict.
- 3a2. User chooses a new date/time.
- Use case resumes from step 3.
Use Case: Delete Appointment
MSS:
- User selects an appointment to delete.
- System requests confirmation.
- User confirms deletion.
- System removes the appointment from the schedule.
- System displays a success message.
- Use case ends.
Extensions:
-
2a. User cancels the deletion:
- 2a1. System stops the deletion process.
- Use case ends.
Use Case: List Clients
MSS:
- User chooses to view a list of all clients.
- System retrieves and displays the client list.
- Use case ends.
Use Case: Find Client by Name
MSS:
- User chooses to search for a client by name.
- System requests the client’s name.
- User enters the name.
- System retrieves and displays matching client profiles.
- Use case ends.
Extensions:
-
4a. System finds no clients matching the entered name:
- 4a1. System displays a “No clients found” message.
- Use case ends.
Use Case: List Appointments
MSS:
- User chooses to view all appointments.
- System retrieves and displays the list of appointments.
- Use case ends.
Use Case: Add Listing
MSS:
- User chooses to add a new property listing.
- System requests details for the listing (name, price, area, address, region, etc.).
- User enters the required information.
- System confirms the details and creates the listing.
- System displays a success message.
- Use case ends.
Extensions:
-
3a. System detects missing or incorrect data:
- 3a1. System prompts for the correct information.
- 3a2. User enters the correct data.
- Steps 3a1–3a2 repeat until all data is valid.
- Use case resumes from step 4.
Use Case: Show Listings
MSS:
- User chooses to view all available listings.
- System retrieves and displays the list of property listings.
- Use case ends.
Use Case: Find Listings
MSS:
- User chooses to search for listings by keyword.
- System requests keywords for the search.
- User enters the keyword(s).
- System retrieves and displays matching listings.
- Use case ends.
Extensions:
-
4a. System finds no listings matching the entered keywords:
- 4a1. System displays a “No listings found” message.
- Use case ends.
Use Case: Edit Listing
MSS:
- User selects an existing listing to edit.
- System displays the listing’s current details.
- User updates the desired fields.
- System confirms the changes and updates the listing.
- System displays a success message.
- Use case ends.
Extensions:
-
3a. User tries to edit a field with invalid data:
- 3a1. System displays an error and requests valid data.
- 3a2. User corrects the data.
- Steps 3a1–3a2 repeat until all data is valid.
- Use case resumes from step 4.
Use Case: Add Buyers to Listing
MSS:
- User chooses to add buyer(s) to an existing listing.
- System requests the buyer index for the listing.
- User enters the buyer index.
- System adds the buyer(s) to the listing.
- System displays a success message.
- Use case ends.
Extensions:
-
3a. System detects invalid buyer index:
- 3a1. System prompts for a valid index.
- 3a2. User enters a valid index.
- Use case resumes from step 4.
Use Case: Remove Buyers from Listing
MSS:
- User chooses to remove buyer(s) from a listing.
- System requests the buyer index for the listing.
- User enters the buyer index.
- System removes the buyer(s) from the listing.
- System displays a success message.
- Use case ends.
Extensions:
-
3a. System detects invalid buyer index:
- 3a1. System prompts for a valid index.
- 3a2. User enters a valid index.
- Use case resumes from step 4.
Use Case: Delete Listing
MSS:
- User selects a listing to delete.
- System requests confirmation.
- User confirms deletion.
- System removes the listing.
- System displays a success message.
- Use case ends.
Extensions:
-
2a. User cancels the deletion:
- 2a1. System stops the deletion process.
- Use case ends.
Use Case: Clear Listings
MSS:
- User chooses to clear all listings.
- System requests confirmation.
- User confirms the action.
- System clears all listings from the system.
- System displays a success message.
- Use case ends.
Use Case: More Info
MSS:
- User requests more information on a specific listing.
- System requests the listing index.
- User enters the index of the listing.
- System displays detailed information for the listing.
- Use case ends.
Use Case: Chat Window
MSS:
- User chooses to open the chat window.
- System displays the chat interface.
- User can interact with the chatbot for assistance with commands and inquiries.
- Use case ends.
Use Case: Help
MSS:
- User requests help.
- System displays general instructions for using the application.
- Use case ends.
Use Case: Exit Application
MSS:
- User chooses to exit the application.
- System prompts for confirmation.
- User confirms the exit.
- System closes the application.
- Use case ends.
Extensions:
-
2a. User cancels the exit:
- 2a1. System returns to the previous screen.
- Use case ends.
Non-Functional Requirements
- Should work on any mainstream OS as long as it has Java
17or above installed. - Should be able to hold up to 1000 persons without a noticeable sluggishness in performance for typical usage.
- A user with above average typing speed for regular English text (i.e. not code, not system admin commands) should be able to accomplish most of the tasks faster using commands than using the mouse.
- The app should be intuitive and require no more than three user actions to perform any major task.
- The codebase should adhere to clear coding principles to allow easy updates and bug fixes.
- The application achieves at least 85% test coverage.
- The user should not require an internet connection to use the application.
- The user should not experience sluggish operations when using the application.
- The user guide should be well-documentated and user-friendly such that a new user can use the application efficiently.
{More to be added}
Appendix: Instructions for manual testing
Given below are instructions to test the app manually.
Launch
-
Initial launch
-
Download the
.jarfile and copy into an empty folder -
Double-click the jar file Expected: Shows the GUI with a set of sample clients. The window size may not be optimum.
-
-
Saving window preferences
-
Resize the window to an optimum size. Move the window to a different location. Close the window.
-
Re-launch the app by double-clicking the jar file.
Expected: The most recent window size and location is retained.
-
Command Summary
-
Adding a Buyer Profile
Use:buyer n/John Doe p/91234567 e/johndoe@example.com
Expected output: Buyer profile is added, and a success message is displayed. -
Adding a Seller Profile
Use:seller n/Jane Smith p/98765432 e/janesmith@example.com a/456 Oak Ave
Expected output: Seller profile is added, and a success message is displayed. -
Editing a Client Profile
Use:editclient 1 n/Jane Doe p/98765432
Expected output: Client profile is edited, and a success message is displayed. -
Deleting a Client Profile
Use:deleteclient 1
Expected output: Client profile is deleted, and a success message is displayed. -
Adding a Listing
Use:listing n/Greenwood House pr/500000 ar/1200 add/456 Elm St reg/central sel/3 buy/2
Expected output: Listing is added, and a success message is displayed. -
Editing a Listing
Use:editlisting 1 n/Eddie House
Expected output: Listing is edited, and a success message is displayed. -
Deleting a Listing
Use:deletelisting 1
Expected output: Listing is deleted, and a success message is displayed. -
Adding Buyers to Listing
Use:addlistingbuyers 1 buy/1 buy/3
Expected output: Buyers are added to the listing, and a success message is displayed. -
Removing Buyers from Listing
Use:removelistingbuyers 1 buy/1
Expected output: Buyers are removed from the listing, and a success message is displayed. -
Listing All Clients
Use:showclients
Expected output: All clients are displayed. -
Listing All Listings
Use:showlistings
Expected output: All listings are displayed. -
Finding Clients by Name
Use:find David
Expected output: All clients matching the specified name are displayed. -
Finding Listings by Keyword
Use:findlisting Greenwood
Expected output: All listings matching the specified keyword are displayed. -
Getting More Information on a Listing
Use:moreinfo 1
Expected output: Detailed information about the listing is displayed. -
Clearing All Listings
Use:clearlistings
Expected output: All listings are cleared, and a success message is displayed. -
Clearing All Data
Use:clear
Expected output: All data (clients, listings, etc.) is cleared, and a success message is displayed. -
Help
Use:help
Expected output: General instructions for using the application are displayed. -
Opening the Chat Window
Use:chatbot
Expected output: The chat window is opened, allowing interaction with the chatbot. -
Exiting the Application
Use:exit
Expected output: The application is closed.
Saving data
-
Dealing with corrupted data files
- Delete the corrupted data files and run the jar file again. The data files should be automatically repopulated with data
Future Enhancements
-
Customizable Command Aliases: Allow users to define their own aliases for commands, making it easier to personalize the command-line experience and speed up common tasks.
-
AI-Driven Insights: Introduce AI-driven analytics accessible through CLI commands to help agents identify property trends, set optimal pricing, and predict client needs. This would turn EZSTATES into a strategic assistant, offering data insights directly within the app.
-
Command Auto-Completion: Add an auto-completion feature that suggests commands and arguments as users type, reducing typing time and minimizing errors.
-
Automated Follow-Up Reminders: Implement a feature to set reminders for client follow-ups. Agents could schedule reminders directly within the CLI to stay on top of leads without needing separate reminders.
-
Dual Role for Clients: Allow a client to be designated as both a buyer and a seller. This would enable agents to manage clients with multiple roles within a single profile, simplifying interactions and reducing redundancy.
-
Calendar Integration: Provide a command to sync appointments with external calendar apps (e.g., Google Calendar), so agents can manage schedules within EZSTATES while keeping appointments visible across platforms.
-
In-App Reporting Tools: Develop simple CLI commands to generate reports on client activities, property listings, and market insights. Reports would be displayed within the CLI, offering agents a quick overview of key metrics without leaving the app.
Appendix: Known Bugs
-
When using multiple screens, if you move the application to a secondary screen, and later switch to using only the primary screen, the GUI will open off-screen. The remedy is to delete the
preferences.jsonfile created by the application before running the application again. -
If you minimize the Help Window and then run the
helpcommand (or use the Help menu, or the keyboard shortcutF1) again, the original Help Window will remain minimized, and no new Help Window will appear. The remedy is to manually restore the minimized Help Window. -
For the n/ prefix, users are not able to put slashes in their names (e.g., Kumar S/O Navareen). A temporary workaround is to input
son oforsoors ountil this issue has been rectified. -
For the add/ prefix, addresses are case-sensitive. As a result,
add/123 Clementi Aveandadd/123 clementi avewill be treated as distinct addresses, which may lead to unintentional duplicates. -
For the Edit Listing command, users can modify listings to assign a buyer as the seller of a listing.
-
For the Add Buyers to Listing command, the Result Display displays an incorrect error message.
-
For the MoreInfo command, the
Outputfor User Error #2 has a missingparametersline where the CLIENT_INDEX should be. Refer to the Special Comments section under More Info for more clarification. -
For the Chatbot, the text input field appears in black, which does not contrast well with its gray background.